ShopDreamUp AI ArtDreamUp

Deviation Actions


Suggested Deviants


Suggested Collections


You Might Like…


Featured in Groups


Description
Please comment and not faving and run! xD
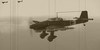
Here is my newest FW 190 model and it is from airfix! Its the A-8 version which appeared in 1944 and like the other FW 190s its nickname is: The butcher bird!
I might confess it is my fave fighter of all time.
Why I wanted to do this one?
I was over in UK last January and visited a model store(they have amazing model stores!) and there I was lookign through all tank and airplane models and I had most of the tanks already so checked on some airplanes and found this one. Just look at it! Its impossible to not like its design (Smile)") So I decided to get it even though it is an airfix kit, their airplane models are okay compared to their tanks in wrong scale....
So I decided to get it even though it is an airfix kit, their airplane models are okay compared to their tanks in wrong scale....
Were thinking also to get their Me BF 109 G-6 with shark teeths or a Me 110 with shark teeths amongst others but I save that for the future.
Since it is my fave fighter and my old FW 190 I built when I was 10 is gone I decided to do this one perfectly and did a lot of research and help from my modelling friends or know how to paint.
This is my first creation using professional tools and wash tools and varnishes and other things I didnt use before, hence why the glass on the plane looks like real glass and not plastic.
The build and what I can teach you about this one if you want to make it yourself:
Well all parts fits perfectly with each other and no need for filling even! Not a surprise since in 2006 airfix got bankrupt and was brought out and the new owner relished all airfix models and improved them, this FW 190 is a new kit hence it isnt as bad as I thought, their earlier models could be a miss or hit thing.
But it still has some issues:
1: Early in the building process you shall put in the chockpit into the side of the fuselage and then put the fuselage together but the thing is: it dont fit well doing so and worse: The upper engine cover which has the smaller machine guns cant either be placed as the manual says, if you try like myself: You will notice it dont fit and cant be positioned inside the fuselage, if you try to use force you will cut off the machine guns against the side of the fuselage, idiotic! Even the manual is wrong, here is how you do it: Dont put in the cockpit with the pilot and such, first step is to glue together the fuselage parts, when that is done: you put in the cockpit into place through the holes where the wings is later located, fits perfectly, and the same with the engine cover with the machine guns: Do it from under beneath.
2: Dont put on the aiming sight on into the cockpit, do that later when the cockpit is inside the fuselage and all is done: The aiming sight is too big for the hole it is meant to be glued into and you cant either put the fuselage together if it is done as the manual say. So use a hobby knife and cut it to fitting size and then glue it into the hole when the fuselage and everything is done.
3: The glass dont fit perfectly either so here you have to be careful and use glue or super glue and masking tape to keep it in place. Also the pilots rear armour protection thingy located behind him blocks the glass so my advice is to locate it as near the pilot as possible and be prepared to maybe shorten it slightly, then it shouldn't be a problem to put on the glass anymore.
4: The snake decal: It is a very long one and easy to damage or tricky to get it positioned right on the fuselage, it took me one hour to get it right on both sides an advice: Keep the decal wet with water, dont skip that or let it dry on one side while you work on the snake decals, as long as they are wet they wont be damaged or cause problems.
I chose to build my FW 190 without the drop tank and the holder since I want my plane sleek and as agile as possible, not going for range.
Overall my opinion: I´m pretty sure this is my best airplane model ever and the new stuff and techniques really made it amazing looking, for the first time the decals isnt flashy, they stick perfectly to the plane and the wash made all panel lines and hatches etc visible, even there the decals are, making the decals look like they are painted onto the plane like a real plane! Also it looks used as well, not too used, wanted it to be flown only 1-2 times before hence not much weathering.
Its amazing to be able to see all small details under the decals and it make the plane look like a real plane, I can almost say this is my first professionally built model")
the end result on it is amazing and the photos dont do it justice, looks even more amazing in real life.
I can say this is the coolest FW 190 airplane on the market to get
Special thanks to:
 for making this collage and being a model maker and given lots of help and hints how to do models.
 He is the one which showed me these ways in making models and its first now I have learned how to wash and weather a model with my new tools, using humbrol enamels seems to be something very few uses hence I couldnt use the info he gave me but now I found the stuff I need and its amazing. Edit: Where are you? O_o
 She told me advices on how to paint models better and use a primer of sorts to make the colors stick better and be easier, and it truly did. Thanks for the advices!
Here is my newest FW 190 model and it is from airfix! Its the A-8 version which appeared in 1944 and like the other FW 190s its nickname is: The butcher bird!
I might confess it is my fave fighter of all time.
Why I wanted to do this one?
I was over in UK last January and visited a model store(they have amazing model stores!) and there I was lookign through all tank and airplane models and I had most of the tanks already so checked on some airplanes and found this one. Just look at it! Its impossible to not like its design
Were thinking also to get their Me BF 109 G-6 with shark teeths or a Me 110 with shark teeths amongst others but I save that for the future.
Since it is my fave fighter and my old FW 190 I built when I was 10 is gone I decided to do this one perfectly and did a lot of research and help from my modelling friends or know how to paint.
This is my first creation using professional tools and wash tools and varnishes and other things I didnt use before, hence why the glass on the plane looks like real glass and not plastic.
The build and what I can teach you about this one if you want to make it yourself:
Well all parts fits perfectly with each other and no need for filling even! Not a surprise since in 2006 airfix got bankrupt and was brought out and the new owner relished all airfix models and improved them, this FW 190 is a new kit hence it isnt as bad as I thought, their earlier models could be a miss or hit thing.
But it still has some issues:
1: Early in the building process you shall put in the chockpit into the side of the fuselage and then put the fuselage together but the thing is: it dont fit well doing so and worse: The upper engine cover which has the smaller machine guns cant either be placed as the manual says, if you try like myself: You will notice it dont fit and cant be positioned inside the fuselage, if you try to use force you will cut off the machine guns against the side of the fuselage, idiotic! Even the manual is wrong, here is how you do it: Dont put in the cockpit with the pilot and such, first step is to glue together the fuselage parts, when that is done: you put in the cockpit into place through the holes where the wings is later located, fits perfectly, and the same with the engine cover with the machine guns: Do it from under beneath.
2: Dont put on the aiming sight on into the cockpit, do that later when the cockpit is inside the fuselage and all is done: The aiming sight is too big for the hole it is meant to be glued into and you cant either put the fuselage together if it is done as the manual say. So use a hobby knife and cut it to fitting size and then glue it into the hole when the fuselage and everything is done.
3: The glass dont fit perfectly either so here you have to be careful and use glue or super glue and masking tape to keep it in place. Also the pilots rear armour protection thingy located behind him blocks the glass so my advice is to locate it as near the pilot as possible and be prepared to maybe shorten it slightly, then it shouldn't be a problem to put on the glass anymore.
4: The snake decal: It is a very long one and easy to damage or tricky to get it positioned right on the fuselage, it took me one hour to get it right on both sides an advice: Keep the decal wet with water, dont skip that or let it dry on one side while you work on the snake decals, as long as they are wet they wont be damaged or cause problems.
I chose to build my FW 190 without the drop tank and the holder since I want my plane sleek and as agile as possible, not going for range.
Overall my opinion: I´m pretty sure this is my best airplane model ever and the new stuff and techniques really made it amazing looking, for the first time the decals isnt flashy, they stick perfectly to the plane and the wash made all panel lines and hatches etc visible, even there the decals are, making the decals look like they are painted onto the plane like a real plane! Also it looks used as well, not too used, wanted it to be flown only 1-2 times before hence not much weathering.
Its amazing to be able to see all small details under the decals and it make the plane look like a real plane, I can almost say this is my first professionally built model
the end result on it is amazing and the photos dont do it justice, looks even more amazing in real life.
I can say this is the coolest FW 190 airplane on the market to get
Special thanks to:
for making this collage and being a model maker and given lots of help and hints how to do models. He is the one which showed me these ways in making models and its first now I have learned how to wash and weather a model with my new tools, using humbrol enamels seems to be something very few uses hence I couldnt use the info he gave me but now I found the stuff I need and its amazing. She told me advices on how to paint models better and use a primer of sorts to make the colors stick better and be easier, and it truly did. Image size
4320x4873px 3.45 MB
Make
NIKON
Model
COOLPIX S8000
Shutter Speed
10/1000 second
Aperture
F/3.5
Focal Length
5 mm
ISO Speed
100
Date Taken
May 11, 2014, 12:24:32 PM
© 2014 - 2024 warrior1944
Comments14
Join the community to add your comment. Already a deviant? Log In
Excellent!